
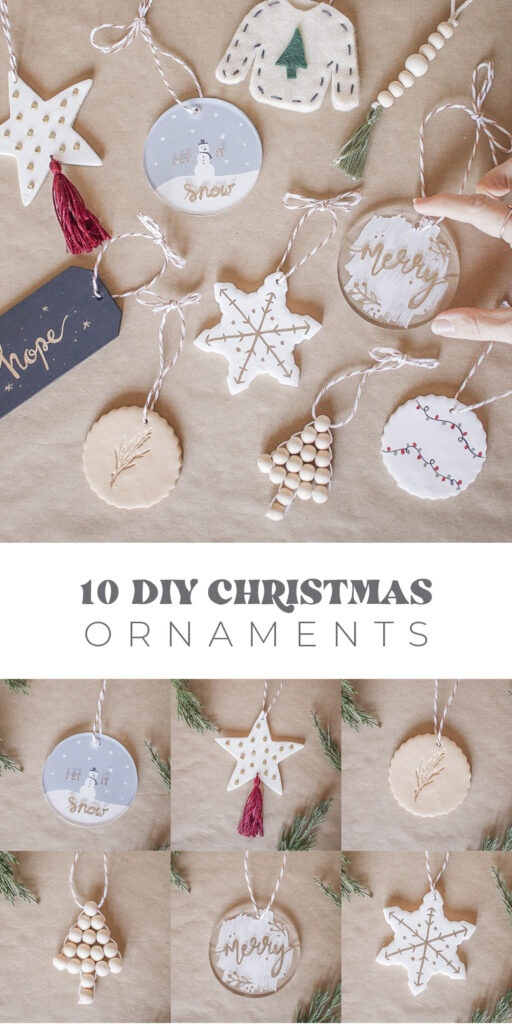
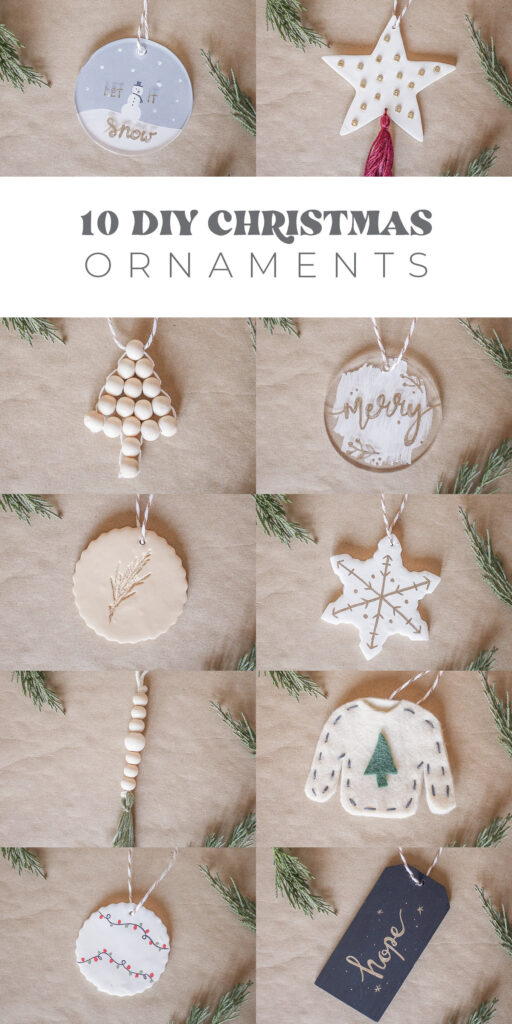
10 Easy DIY Christmas Ornaments
I’m back with TEN DIY Christmas ornaments!! You may remember I did this last year with 10 DIFFERENT DIY ornaments, so you can find TWENTY DIY ornament ideas on this blog! This years are even easier to make than last years because I’m a mom now and ain’t nobody got time for a complicated DIY! Each of these could easilyyyy be made in 20 minutes or less!
If you’re wondering why in the world I would come up with 10 DIY ornaments two years in a row, here’s a little backstory:
A church in LA – Expression 58 does a charity fundraiser each year where they sell hundreds of ornaments all at different price points whose proceeds go to different causes – depending on which ornament you choose. It’s a really amazing event and I was asked to design the 10 ornaments for them to sell, then a bunch of volunteers replicated them to make the hundreds that they need. So, I had to make them very easy to make since we were going to have to make so many.
Anyways, I really did have a lot of fun making these so let’s get to it! I have a separate supply list and tutorial for each one!!
‘Merry’ Acrylic Ornament

SUPPLIES:
Acrylic Ornaments
Gold Paint Pen
White Paint
Paintbrush
DIRECTIONS:
- Use gold paint pen and write ‘merry’ on the front of the ornament.
- Add two small branches and a few dots.
- Flip the ornament over and paint some brush strokes in white.
- Attach twine to the ornament.
Star & Tassel Ornament

SUPPLIES:
White Sculpey
Star Cookie Cutter
Glass Gold Beads
Red Embroidery Thread
DIRECTIONS:
- Use rolling pin to roll out white Sculpey.
- Use a cookie cutter to cut out a star shape.
- Use a needle to add a hole to the top for the twine.
- Add a hole on the bottom as well for the tassel.
- Take gold beads and press them into the clay.
- Bake it for 15 min at 275.
- Find tassel tutorial HERE
- Attach the tassel and the twine to your ornament.
Beaded Tree Ornament

SUPPLIES:
Wooden Beads
White Embroidery Thread
Tacky Glue
DIRECTIONS:
- Find the tutorial for this ornament HERE!
*You can also use tacky glue to hold the beads together better.
Tree Sprig Ornament
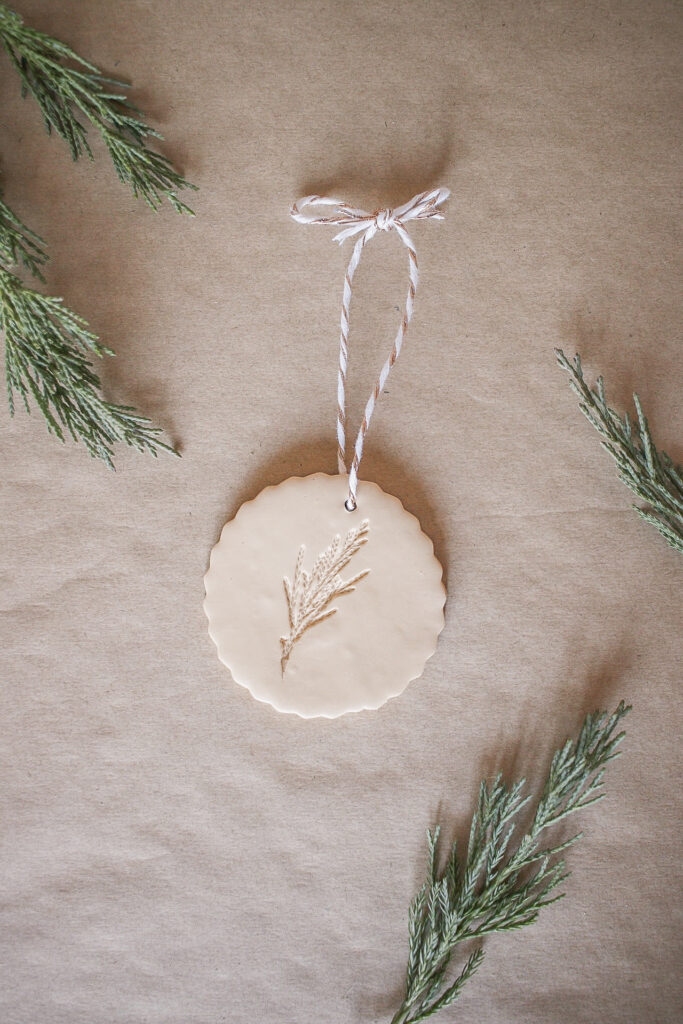
SUPPLIES:
Tan Sculpey
Circle Cookie Cutter
Sprigs from a Tree
DIRECTIONS:
- Use rolling pin to roll out ten colored Sculpey.
- Take a tree sprig and place it onto the clay.
- Use your rolling pin and roll on top of the tree sprig, then remove the tree sprig.
- Then Use circle cookie cutter to cut out a circle, making sure the tree imprint is centered.
- Use a needle to add a hole to the top for the twine.
- Bake it for 15 min at 275.
- Attach the tassel and the twine to your ornament.
Snow Globe Ornament
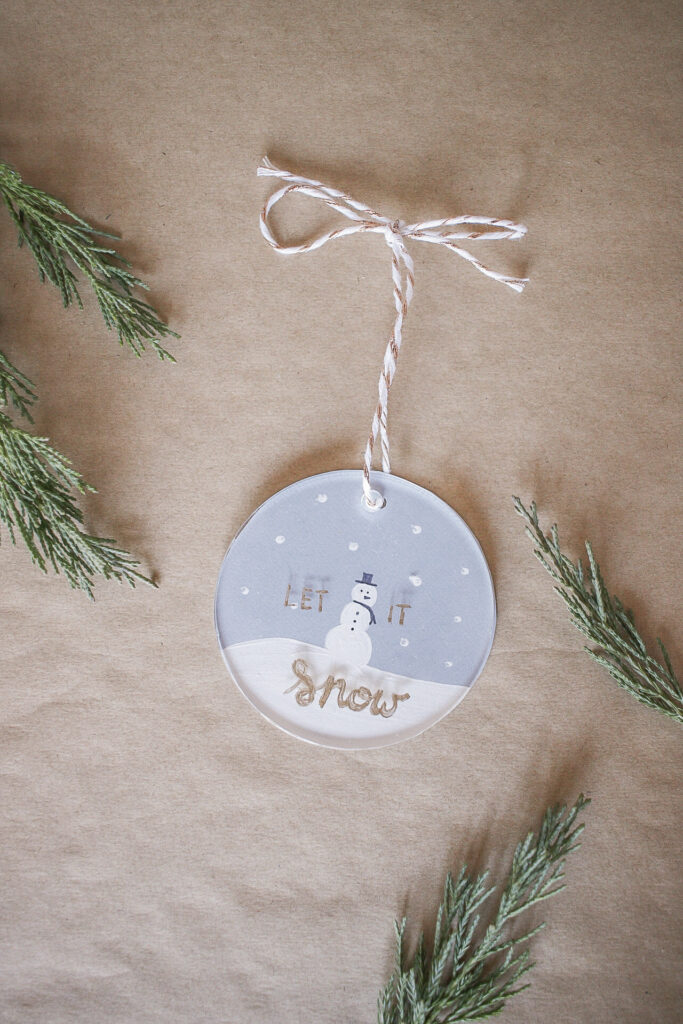
SUPPLIES:
Acrylic Ornament
Blue Card Stock Paper
Hold Punch
White Paint
Black Sharpie Pen
Gold Paint Pen
DIRECTIONS:
- Write ‘Let It Snow’ with gold paint pen onto acrylic ornament.
- Use circle ornament to trace circle onto blue cardstock and cut it out.
- Use hole punch to punch a hole at top of cardstock.
- Use white paint and paint bottom section of cardstock.
- Paint three circles to form the snowman.
- Use end of paintbrush and add white dots for the snow.
- Use black sharpie pen to add eyes, nose, hat and scarf to snowman.
- Attach twine through both the acrylic ornament and cardstock holes to connect them.
Snowflake Ornament
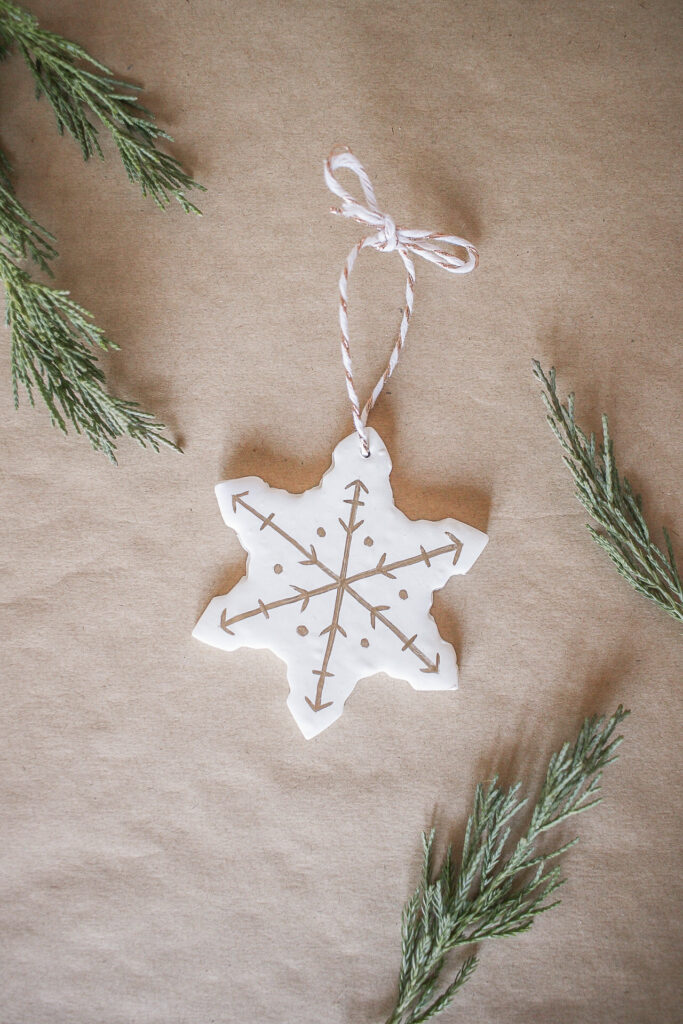
SUPPLIES:
White Sculpey
Snowflake Cookie Cutter
Gold Paint Pen
DIRECTIONS:
- Use rolling pin to roll out white Sculpey.
- Use a cookie cutter to cut out a snowflake shape.
- Use a needle to add a hole to the top for the twine.
- Bake it for 15 min at 275.
- Use a gold paint pen to add snowflake lines and dots.
- Attach twine to the ornament.
Beads With Tassel Ornament
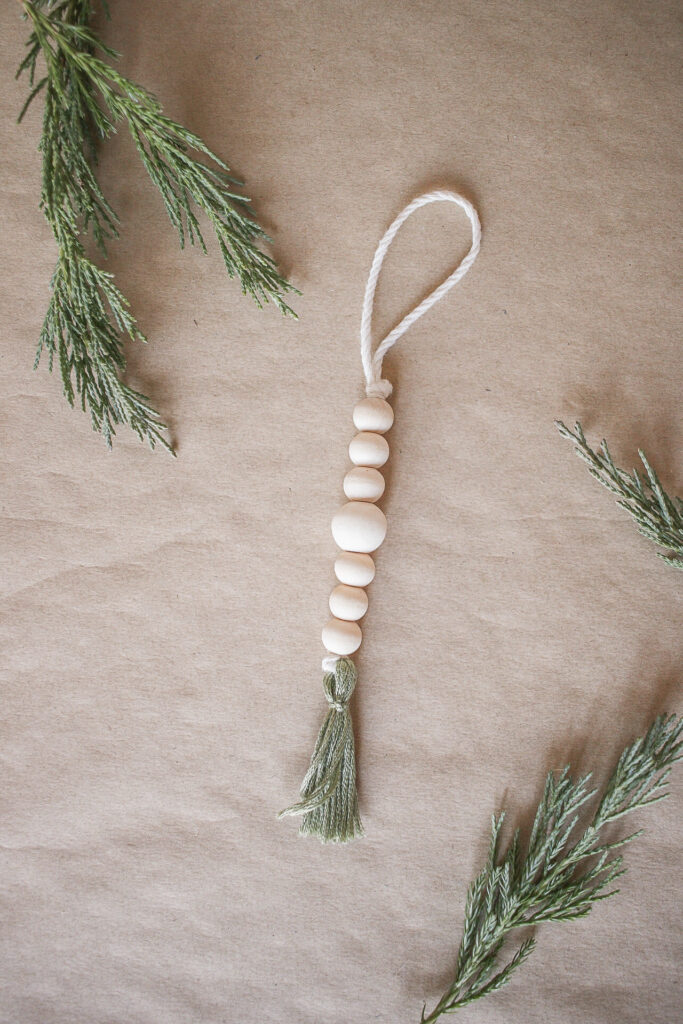
SUPPLIES:
Wooden Beads
Green Embroidery Thread
Cotton Twine
DIRECTIONS:
- Add tape to the end of cotton twine to make it easier to get into the beads.
- Add beads to string, three small beads, one larger bead, and three more small beads.
- Thread string back through the beads, leaving a loop at the top, then knot the loop.
- At the other end of the beads, knot the string and add a green tassel.
- Find tassel tutorial HERE!
Christmas Sweater Ornament
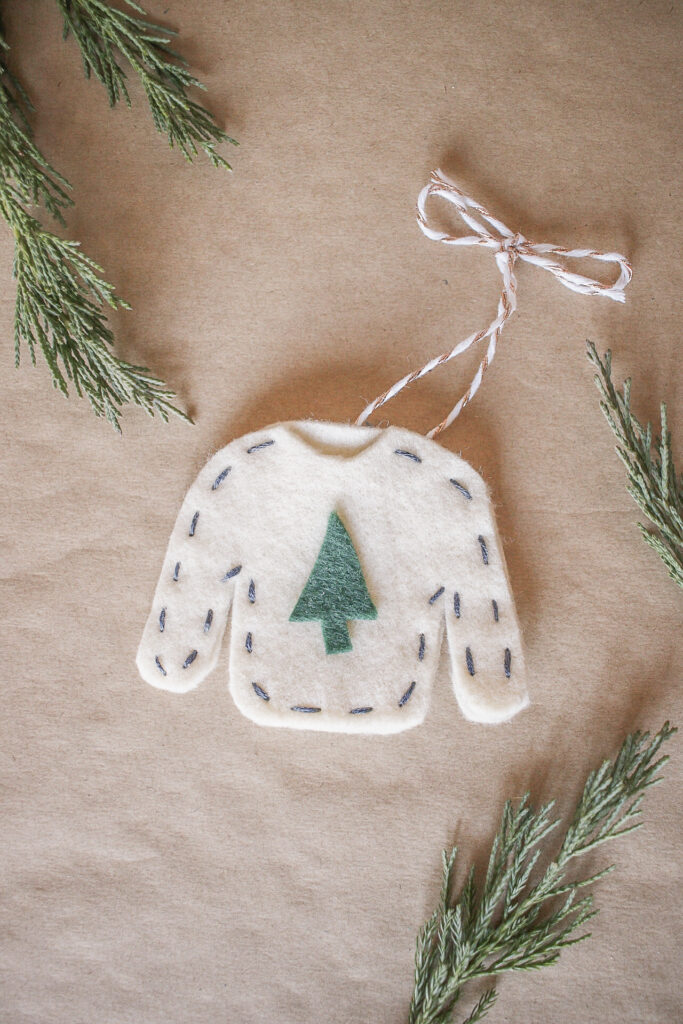
SUPPLIES:
Cream Felt
Green Felt
Template Printable (enter your email below for the template)
Embroidery Thread
Fabric Glue
DIRECTIONS:
- Use printable template I provided and cut it out.
- Then trace both the front and back template onto cream felt and cut them out.
- Layer the two sweater pieces together use fabric glue to attach the two.
- Sew the edges together with embroidery thread.
- Cut out the tree from the paper template and then trace it onto green felt.
- Cut out the felt tree and use fabric glue to attach it to the sweater.
- Attach twine to the ornament.
Christmas Lights Ornament
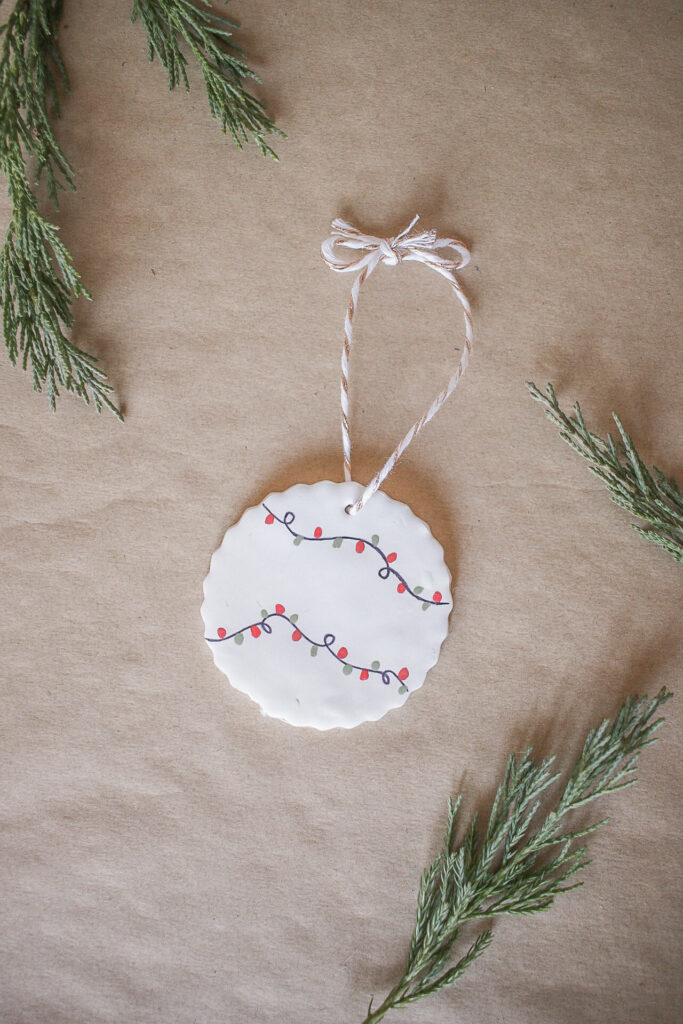
SUPPLIES:
White Sculpey
Circle Cookie Cutter
Black Sharpie Pen
Red Paint
Green Paint
Small Paintbrushes
DIRECTIONS:
- Use rolling pin to roll out white Sculpey.
- Use circle cookie cutter to cut out a circle.
- Use a needle to add a hole to the top for the twine.
- Bake it for 15 min at 275.
- Use a black sharpie pen and draw two curly lines on the clay circle.
- Use a small paintbrush and paint green Christmas lights onto the lines you just drew.
- Now add red Christmas lights with red paint.
- Attach twine to the ornament.
Hope Tag Ornament

SUPPLIES:
DIRECTIONS:
- Use gold paint pen and write ‘hope’ onto the chalkboard tag.
- Use paint pen to add a few stars and dots.
- Attach the tassel and the twine to your ornament.
That’s it for the 10 Easy DIY Christmas ornaments!! I had so much fun making these, and I think I’m going to make a bunch of the ‘Merry’ Acrylic ornaments for friends this year!! I’d love to know which is your fave! If you make any pretty please tag or DM me @mikylacreates on Instagram!!
I’m excited to make the sweater ornament with some scrap fabric I have lying around at home!
I’m in love with the beaded tassel one! My holiday decor budget is slim since we just had our floors refinished, so I’ve been resorting to lots of DIY projects this season. Luckily I have lots of craft materials on hand, so I can easily make some new ornaments for my tree! Thanks for the inspo!